Saturday 31 May 2014

So very grateful


I recently received a much awaited parcel with my latest Stampin' Up goodies. It's funny how some stamp sets you fall for immediately and others you don't feel anything for before you see that one perfect card and it just clicks. "So very grateful" was one of the latter, I didn't think I would get it until I started seeing beautiful cards with the stamps in white embossing on kraft card and coloured with watercolours or inks. They were simply stunning, and I had to get the stamp set. Although the idea is so simple, I think it's very 

I needed a thank you card and immediately went for the white embossing and kraft look. I coloured using an Aqua-Flo brush and Stampin Up' inks. I also stamped the smaller stamp inside the card and on the envelope. The colouring is easy with the heat embossed outlines preventing the colour to flow outside the lines, and the colours look soft and muted on the kraft card.

I'm entering this card into the following challenges:
Addicted to Stamps - Make your mark (coloured using aqua brushes)
Addicted to CAS - Texture (heat embossing)
Just add ink - Just add watercolour 
Simon Says Stamp Wednesday challenge - Anything goes
The Pink Elephant - Anything goes


Cardstock: Eco ribbed 300 gsm rustic kraft card, white patterned card from my stash, Hobbycraft three shades of blue 160 gsm card
Stamps: Stampin' Up So very grateful
Inks: Tim Holtz distress embossing ink and Black Soot, Stampin' Up inks in Daffodil Delight, Marina Mist, Melon Mambo, Pear Pizzazz, Pumpkin Pie, Regal Rose and Wild Wasabi
Other: Papermania Seafoam white embossing powder, Ranger ultra fine clear embossing powder

Wednesday 28 May 2014

Butterfly thanks


My mojo has been AWOL lately. I spent several hours crafting on Monday, but only managed to fill my trash without creating anything worth keeping. Today I was lucky enough to leave work a bit earlier than usual after attending a course all day. After finally getting home (thank you to whoever it was who thought it's ok to do 50 mph on the A14 in rush hour in the right hand lane...) I snuggled on the sofa with a cup of tea and my collection of challenge blogs to try and revive my dead mojo. As usual that got the old creative neurons firing. I was super-inspired by the current Poppy challenge, I loved both the colour combo and the sketch. I also got a bit obsessed with the spots in the picture challenge from Stampin' Royalty and just had to add some to the card. I am also submitting the card to Addicted to Stamps which has the theme "Make your Mark" as I coloured the butterflies with markers.


Cardstock: Leonardo Stationery 350 gsm Smooth White Card, Hobbycraft 160 gsm white card, Dovecraft 110 gsm Premium Vellum, Stampin' Up Basic Gray card, pink leftover cardstock from my stash
Stamps: Kanban Butterfly stamp, Paper Smooches Sentiment Sampler
Ink: Stampin' Up Basic Grey ink, Stampin' Up markers Blushing Bride and Soft Sky, Tim Holtz distress embossing ink
Paper: Stampin' Up Patterns Stack - Brights collection
Other: Ranger ultra fine clear embossing powder, Papermania Seafoam White embossing Powder, Tim Holtz Alterations Vintage Lace die, Stampin' Up Jewels basic rhinestone


Sunday 25 May 2014

Distressed cogs


I have no idea where the idea for this card came from. I was cleaning up my craft room and had the computer sitting next to me with the CAS(E) this Sketch page open. I wasn't going to do a card for this sketch challenge as the sketch didn't do anything for me at first. But all of a sudden I had this card. I'm not quite sure what happened in between, all I can recall is a lot of distressing, which is always fun.


I die cut the cogs and used the range of neutrals from Tim Holtz to distress them.  I then stamped using the same inks and the ever so versatile Gorgeous Grunge stamp set in the same colours across the cogs and some kraft card. The smallest cogs are stamped directly onto the cardstock using stamps from a Chronology stamp set as the smallest die cut cog was too big to fit everything onto a card. Last I distressed the panel for the sentiment and stamped a sentiment from the Paper smooches Sentiment Sampler onto the panel and attached everything onto the kraft card. I have to say this is definitely one of the rare cards that ended up looking better than the idea in my head, which is always a nice change.


Card: Hobbycraft 160 gsm white card, Ribbed 300 gsm Rustic Craft Card, Craft UK kraft card
Stamps: Paper Smooches Sentiment Sampler, Stampin' Up Gorgeous Grunge, Chronology stamp set with gears and globe (I think this was free with a Docrafts magazine sometime last year, I got them on Ebay)
Inks: Tim Holtz distress ink in Aged Mahogany, Antique Linen, Black Soot, Pumice Stone, Vintage Photo and Walnut Stain
Other: Tim Holtz Alterations Gadget Gears die

Saturday 24 May 2014

My CASest card so far


I had to do some emergency crafting this morning. I had planned to devote the whole bank holiday weekend to crafting as the weather forecast didn't look like it was going to be amenable for gardening. However, I was told a few days ago we are having guests stay over instead, so there goes my crafting time. The short while I spent in the craft room this morning may well be my only stab at crafting this weekend. 

I've had this idea of a rainbow coloured card for a while now, but it was only with the emergence of a number of floral/nature themed challenges this week that my mind kind of figured out what to do with the beginning of an idea. And as I knew I would soon have to get out of my crafting bubble to clean the house, a quick, clean and simple design would have to do for this morning. To be honest, although it looks quick and easy, it took quite a few trials and errors until I got the card looking the way I wanted to.

I coloured the stamp from Stampin' Up Reason to Smile set using Tim Holtz distress markers in the seasonal colours. I lightly spritzed with water mist before stamping onto white card. I used the Stamp-a-ma-jig to stamp the matching flower outline in Basic Gray. I used the Basic Gray marker and the Tim Holtz markers to colour the sentiment from See Ya Later. I finished off with adhesive gems from Papermania. This is the most CAS card I have ever made, and it's hard with all that white space left everywhere, but I'm getting used to it. I think it actually turned out quite good. And such a fitting sentiment for a day like this with nothing but grey skies.

I am entering this card into the following challenges and browsing the lovely cards from the DTs  really helped get my mojo going as usual.
Addicted to Stamps - Anything goes
Simon Says Stamp Monday challenge - Botanical 
Make My Monday - Nature
CASology - Flower

Card: Leonardo Stationery 350 gsm Smooth White Card, Hobbycraft 160 gsm white card
Inks: Stampin' Up Basic Gray, Stampin Up' marker Basic Grey, Tim Holtz distress markers Festive Berries, Mowed Lawn, Peacock Feathers, Picked Raspberry, Ripe Persimmon, Salty Ocean, Seedless Preserves and Squeezed Lemonade
Other: Papermania Adhesive gems

Wednesday 21 May 2014

Fox and Friends in a box


My sister was studying for her med school finals this spring, and I'm so very proud of her, she has done an amazing job and passed with flying colours among the best of her year. I sent this little box card with Fox and his friends to cheer her on when she was studying for her last exams. This was quite a while in the making with all the different parts and lots of fussycutting. And so many ink pads as well! But I think it turned out to be a very cheery card.

These lovely cards-in-a-box have been popping up all over the blogosphere and pinterestosphere (yes, of course it is a real word, it's not like I would just have made it up). Using the measurements in the links, the card will fit into a 15.5x15.5 cm (6x6 in) envelope, so it can be mailed for the same postage as any other card. I don't know who originally came up with the idea, but I used this lovely box card with loads of animals from Mommy Stamper for inspiration. However, as the measurements in that blog post were in inches, and I feel more comfortable working in centimeters, I used this tutorial from Monica's passions. If you don't know how to make the card, instead of me explaining, just hop over to either of those blogs for a video tutorial. The centimeter card results in a bigger card as you use a sheet of A4 to start, whereas the card on Mommy Stamper starts with a 9x5 1/2 (22.8x14cm) in sheet of cardstock.

The process of creating the card involves some cutting and scoring. I don't have a scoreboard, I just bought some scoring tools (called Soft-Grip Embossing & Stylus set) online for a few quid and I use a ruler as a guide when scoring. Works like a charm, I really want to get a scoreboard at some point, but it hasn't made it anywhere close to the top of my wish list yet, so I am just sticking to this hack for now. Please refer to the videos on instructions for how to make the box, but once you know how to make it and just need a reminder of where to score, the scoring is at 7, 14, 21 and 28 cm and lengthwise at 7 cm and then cut at 15 cm. The size for the 4 papers at the top of the box are 6.5x6.5 cm and for the bottom you need three pieces measuring 6.5x7.5 cm. The longer piece at the back measures 6.5x14.5 cm.

For my card, I made the box from Stampin' Up Basic Gray cardstock and then it was just about stamping and fussycutting the cute little creatures and stamping the side panels with gorgeous grunge and adding the die cut letters.


Inks: Stampin' Up Blushing Bride, Calypso Coral, Coastal Cabana, Crumb Cake, Daffodil Delight, Pistachio Pudding, So Saffron, Strawberry Slush, Tempting Turquoise and Wild Wasabi
Cardstock: Stampin' Up Basic Grey, Calypso Coral, Daffodil Delight, Strawberry Slush Tempting Turquoise, Wild Wasabi and Hobbycraft white 160 gsm cardstock
Other: Tim Holtz Inside Out Alphabet die, Fiskars duck punch, Embossing tool from the Soft-Grip Embossing and Stylus set

Sunday 18 May 2014

M is for metallic


I had a browse through my stash the other day. All those extra bits and pieces you don't want to throw away just in case, but which you have no use for. I had so much more stuff stashed away than I could remember... So I decided to pick something from the stash and make a card or two. I picked two metallic panels I had made quite a while ago using an Inkadinkadoo stamp and heat embossing. I then browsed some of my favourite challenges to find some inspiration what to do with them. 

Stash part one - left over card parts waiting to be used
Stash part two - left over cardstock slivers sorted into whites, DSP and colour card
Stash part three - more or less finished card panels waiting for inspiration
By coincidence the theme of both the Shopping our Stash challenge and Addicted to Stamps challenge is Inspired by a song. For the golden panel, the obvious choice was We are Golden by Mika. A song about friendship. Inspired by the song, and this weeks Retro sketch the card came together. I am also entering the gold card into this week's Simon Says Stamp Wednesday challenge "Die Crazy" as the circles and the letters are die cut, and as a bonus the flowers are cut using a punch.

The silver card was inspired by this week's Freshly Made sketch and the great colour combo in Color Throwdown. I am also entering it into Simon Says Stamp Monday challenge which is themed M, and in my card M is for metallic, Melon Mambo and Mixed Bunch (the name of the stamp set I used for the flower).


To create both metallic panels I stamped the Inkadinkadoo background stamp in Tim Holtz distress embossing ink and heat embossed using Papermania silver and gold embossing powders. For the gold card, I used a DSP from the Kaisercraft Christmas collection pad which came with issue 117 of Simply Cards&papercraft magazine. I die cut the circles from leftover bits of black and gold paper in my stash. The flowers are from Stampin' Up Petite Petals and heat embossed using gold embossing powder and punched using a matching punch. The letters for "Friend" are cut from the same scrap gold paper using Tim Holtz alterations inside out alphabet die. As final details I added some gold sequins from my stash I have never used before although having them for years and used a gold Sharpie to colour a few clear adhesive gems to add to the sequins and flowers. I matted the DSP onto leftover black cardstock and adhered everything onto a square kraft card.

For the silver card, I stamped one of the flowers from the Mixed bunch set in clear embossing ink and heat embossed using silver embossing powder, and punched with a matching punch. I cut a strip from Stampin' Up summer smooches DSP in lucky limeade and another from white cardstock. I used a sentiment from the Papermania Urban Stamps 12 days of Christmas Word banner stamp set and inked around the edges with a foam applicator. I attached everything onto Stampin' Up Melon Mambo DSP and matted onto black paper before attaching to a square white card. To finish, I added a pink adhesive gem to the flower.

It always feels extra good to create cards with leftover bits and pieces, and to see how something that originally wasn't going to amount to anything actually turn into a beautiful card. I'm extra pleased with the gold card as I'm really bad with using metallics and using gold is very difficult for me.

Card: Craft UK craft card, Leonardo Stationery 350 gsm Smooth White Card, Stampin' Up cardstock in Melon Mambo, Hobbycraft 160 gsm white card, unidentified leftover black and gold card from my stash
DSP: Stampin' Up Patterns stack - Brights collection and Summer Smooches, Kaisercraft 6" Paper Pad Christmas Collections
Stamps: Inkadinkadoo background stamp, Stampin' Up Petite Petals and Mixed Bunch, Papermania Urban stamps 12 days of Christmas - Word Banner
Inks: Tim Holtz distress embossing ink, Stampin' Up Wild Wasabi
Other: Stampin' Up Petite Petals and Blossom punch, Papermania embossing powders Tinsel Silver and Enchanted Gold, Papermania adhesive gems Capsule Red Hot, Stampin' Up clear adhesive gems, Tim Holtz Alterations Inside Out Alphabet die, golden sequins from my stash, gold Sharpie

Saturday 17 May 2014

Poppy Challenge #4


Inspiration is funny sometimes. I really loved this week's Poppy sketch, and immediately got an idea what I wanted to make. But I couldn't make that work, and at the same time this idea came to me instead. I really like the Banner Blast stamp set and matching punch, but haven't used it very much (isn't that always the same story!). I didn't have the exact colours for the challenge, but I used the closest replacements from the Stampin' Up palette.


I guess it's quite obvious from the card how it was created. I stamped the banners and punched out, stamped the background using Gorgeous Grunge and the star from the Banner Blast set. Last, I stamped the sentiment and attached everything into place. 

Card: Leonardo Stationery 350 gsm Smooth White card, Hobbycraft 160 gsm white card, Stampin' Up Crisp Cantaloupe and Coastal Cabana card
Inks: Stampin' Up Crisp Cantaloupe, Coastal Cabana and Pistachio Pudding
Stamps: Stampin' up Banner Blast, Gorgeous Grunge and Yippee-Skippee!
Other: Stampin' Up Banner punch

Monday 12 May 2014

Two cards for two challenges


This week I have been so inspired by the colour combo on Color Throwdown as well as the sketch over on CAS(E) This Sketch. I made not one, but two cards for these two challenges. I have also been playing a lot with my Tim Holtz Distress Paints, as I got a bunch of new colours recently. And perfectly for this challenge, two of them were Peacock Feathers and Mowed Lawn. And those together with Chipped Sapphire were perfect for the colour challenge.


For the froggy card I dotted Distress Paints onto my crafting mat, spritzed with water and moved a piece of watercolour paper across the paint. While drying I stamped the froggy in black ink and coloured with Distress markers and an AquaFlo brush. I cut the banner, stamped the sentiment and attached everything onto cardstock. As a final touch I added some Ice Stickles on the bottom of the card.

Card: Leonardo Stationery 350 gsm Smooth White Card, Daler&Rowney 300 gsm Aquafine watercolour paper, Hobbycraft 160 gsm white card
Stamps: Paper Smooches A Little Lovin
Inks: Tim Holtz Chipped Sapphire ink pad, Peacock Feathers, Mowed Lawn and Squeezed Lemonade markers
Other: Tim Holtz Paints Chipped Sapphire, Mowed Lawn and Peacock Feathers, Ranger Ice Stickles Mint Ice

For the butterfly card I made a similar background using TH Paints, but first I stamped En Francais in clear embossing ink and heat embossed using clear powder. I embossed the white tag, which was made using the tag topper punch from Stampin' Up. I stamped the butterfly in TH Chipped Sapphire, heat embossed using clear powder and coloured using TH markes. Last, I die cut the letters and attached everything onto a white card base.

Card: Leonardo Stationery 350 gsm Smooth White Card, Hobbycraft 160 gsm white card
Stamps: Stampin' Up En Français, Hobbycraft Butterfly
Inks: Tim Holtz Chipped Sapphire and clear embossing ink pad, Peacock Feathers and Mowed Lawn markers
Other: Tim Holtz Paints Chipped Sapphire, Mowed Lawn and Peacock Feathers, Ranger clear fine embossing powder, Stampin' Up tag topper punch, Cuttlebug script embossing folder, Tim Holtz inside out alphabet die

Sunday 11 May 2014

Mother's day card in a box

Now that my Mum has seen her Mother's Day card, I can finally show it on the blog as well. I wanted to make something special for Mum, so I made a card-in-a-box filled with flowers. I don't know who originally came up with the idea, but I used this lovely flower filled box card with from Mommy Stamper for inspiration. However, as the measurements in that blog post were in inches, and I feel more comfortable working in centimeters, I used this tutorial from Monica's Passions for making my box. If you don't know how to make the card, instead of me explaining, just hop over to either of those blogs for a video tutorial. The centimeter card results in a bigger card as you use a sheet of A4 to start, whereas the card on Mommy Stamper starts with a 9x5 1/2 (22.8x14cm) in sheet of cardstock.


I used the Stampin' Up Tea for Two DSP for my box and stamped flowers from the Petite Petals stamp set in Regal Rose, Calypso Coral, Blushing Bride and So Saffron. I also stamped the butterfly from the Bloomin' Marvelous set in Marina Mist. I fussycut the butterflies and punched the flowers with the matching punch. I also punched a few flowers from an old scrap of Old Olive cardstock to make the leaves. I used a stamp from the Punch Bunch for the sentiment and finished with a bow and some bling in the form of adhesive gems.

I am entering this card in the following challenges:

The Pink Elephant #249 - Mother's Day

Stampin' Royalty challenge #227 - May Flowers (this is my second entry for this challenge)

Simon Says Stamp Wednesday Challenge - Spring Flowers (this is my second entry for this challenge)

Craft Hoarders Anonymous - Ribbon, Lace and Twine

Inks: Stampin' Up Blushing Bride, Calypso Coral, Marina Mist, Regal Rose and So Saffron
Cardstock: Stampin' Up River Rock, Calypso Coral, Old Olive, Hobbycraft cream 160 gsm cardstock
Stamps: Bloomin' Marvelous, Petite Petals, Punch Bunch
Paper: Stampin' Up Tea for Two
Other: Petite Petals Punch, Pink ribbon from my stash, Stampin' Up adhesive gems


Saturday 10 May 2014

Purple flowers

I’m back in the Crafting Room again! After a busy week without any crafting time, I’ve spent a large part of today completely absorbed in my little creative corner of the world. My brain was on creative overdrive (this is the opposite of blank paper syndrome, creative overdrive is when you have so many ideas you just can’t get them done quick enough). And I completely blame all the crafting challenge blogs out there. You are conspiring against me! Too many great themes, sketches and colour combos at once. There’s only so much a girl can take!

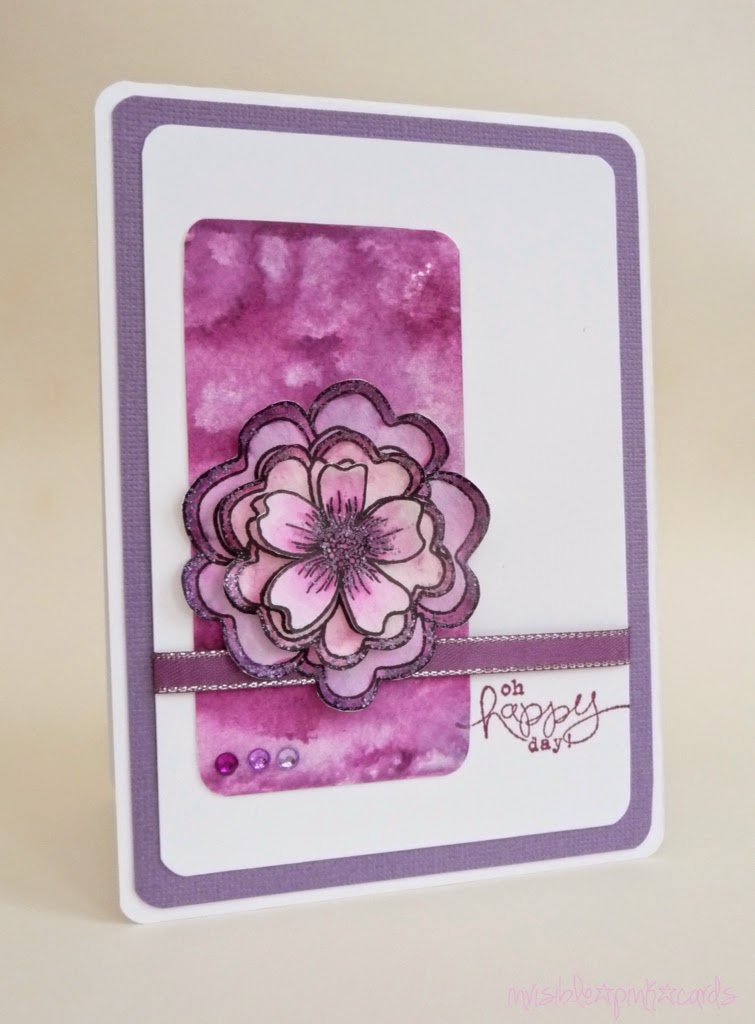
The theme for the Card Concept 9 is monochromatic purple. Not that I’m excited, but it’s my favourite colour. Ever! In addition to pink… So obviously, I had to go there. Coincidentally (or not, is this a conspiracy?) the theme over on Make My Monday is Seasonal Flower colours with the below picture for inspiration. Hello, purple AND flowers. The only question was: which purples and which flowers? I have so many flower stamps. I’m pretty much obsessed with them! In the end I picked the Hero Arts Layered flowers stamps, as they are great for dimensional flowers, and I thought a monochrome colour scheme deserves a lot of texture. I also happened to receive a batch of Tim Holtz distress paints today that I had ordered from Ebay, and one of the colours was Dusty Concord. Hello there Distress Paint background!

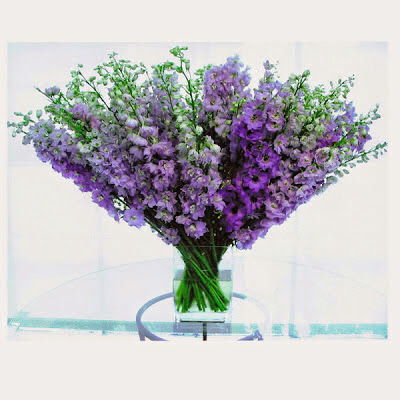
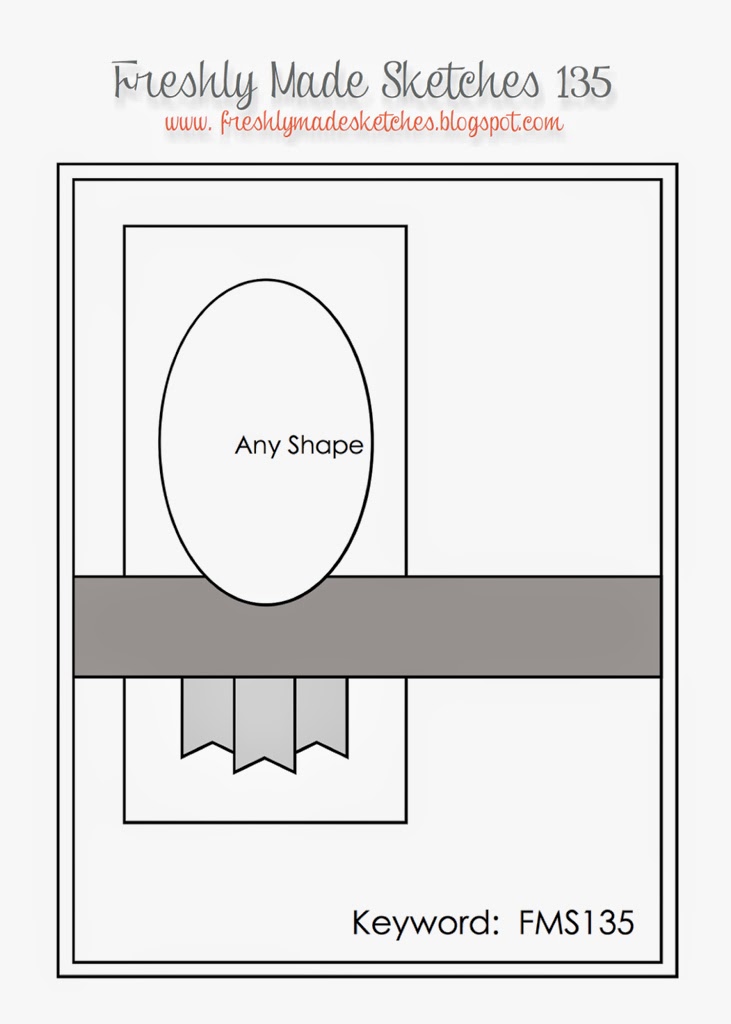
Picture inspiration from Make My Monday

I also completely love this week’s Freshly Made Sketch, and immediately saw the oval in the sketch transform into a flower. I wasn’t going to do a CAS card as I’m not very good at them, but somehow that’s how this card ended up. The Card Concept asks you to define your card style according to some categories they have, and out of those, my card would be Clean and Layered. I am also submitting the card to the Simon Says Stamp Wednesday Challenge where this week’s theme is Spring Flowers, and to Stampin’ Royalty Challenge #227 themed May Flowers. I usually don’t enter this many challenges with one card, but what can you do, when it works it works. And I love browsing the challenge blogs absorbing inspiration from amazing DT cards and crafts.

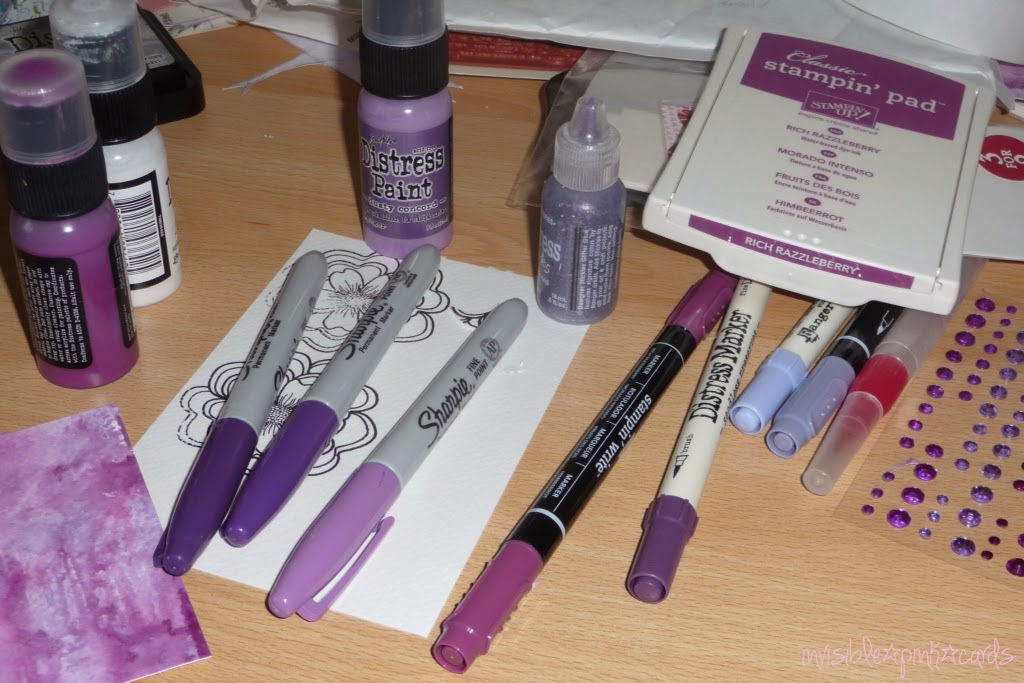
I used Tim Holtz distress paints along with plenty of water from a spritzer onto watercolour paper to create the background. I just dabbed Picket Fence, Dusty Concord and Seedless Preserves onto a crafting mat (actually I use a non-stick baking sheet, but it works perfectly well!) and swirled the paper around in the paint. I stamped the flower in black Staz-on ink three times onto watercolour paper and fussycut using scissors. I coloured the flowers with Stampin’ Up Rich Razzleberry, Tim Holtz Seedless preserves markers and an AquaFlo brush and added Tim Holtz Distress stickles in Dusty Concord before attaching the layers using dimensionals. I matted onto Tim Holtz Dusty Concord cardstock, added some ribbon from my stash, some adhesive gems and stamped the sentiment from the Stampin’ Up Bloomin Marvellous set in Rich Razzleberry with the help of a stamp-a-ma-jic.


Card: Leonardo Stationery 350 gsm Smooth White Card, Tim Holtz Disterss Core’dinations card, Daler&Rowney 300 gsm Aquafine watercolour paper

Stamps: Hero Arts Layered Flowers, Stampin’ Up Bloomin Marvellous

Inks: Stampin’ Up Rich Razzleberry, StazOn Jet Black, Stampin’ Up Rich Razzleberry marker, Tim Holtz Seedless Preserves marker

Other: Tim Holtz Distress Paints Dusty Concord, Picket Fence, Seedless Preserves, Tim Holtz Distress Stickles Dusty Concord, Papermania Adhesive gems Capsule Heather, AquaFlo brush, ribbon from my stash

Why would you think purple is my favourite colour?


Tuesday 6 May 2014

Birthday present bag and card


I'm going for a birthday celebration tomorrow, and wanted to make a customised gift bag and matching card for the present. I got my inspiration from the beautiful pastel yellows, greens and pink/coral of the chocolate box I bought as a present. 


The inspirational colour combo
For the card, I used the colour combo from the chocolate box and I stole the idea for the card from my guest stamper, my Sis. She made the awesome green and pink birthday card you can see below, and I used the green hardwood background as an inspiration for my card. I added the same Petite Petals flowers I used for the bag and added a birthday sentiment in bright yellow. It was so much fun stamping with my sis. She got very creative and also made some artwork for her home.


Birthday Card made by Sis that I used for inspiration.
My Sis got inspired by stamping and made this scrapbook page.

To create my bag I measured the chocolate box and calculated the size of the gift bag that would be needed. I ended up using a 10x12 in piece of DSP, and used the remaining 2 in piece to create the tags for the ribbon. I scored the DSP at 1.5 and 8.5 in in the longer direction and at 5 1/4 and 6 3/4 in in the shorter direction (see sketch below). Then just cut as indicated, fold and put some double sided adhesive on the small squares and one of the long side "flaps" on both sides and assemble. I got the idea for this bag from the Pootles blog, which has a video showing how to assemble the bag (although it's a different size to mine), check it out. I then inked the edges of the bag with Daffodil Delight ink and a foam applicator and created 2 tags with the scalloped tag punch. I inked the edges of the tags as well and attached the ribbon to the back of one of the tags. I then attached the tags to the gift bag. To finish off the bag, I stamped four flowers in Pistachio Pudding using the Petite Petals matching stamp set and punch, curled the leaves of the flowers and attached adhesive gems. 


For the card, I stamped the hardwood stamp in Pistachio Pudding onto white cardstock. I also stamped the birthday sentiment from See Ya Later in Daffodil Delight and cut out in the shape of a banner. I used the same ink and a foam applicator to ink the edges of the banner. I stamped flowers in Daffodil Delight and Crisp Cantaloupe I attached everything into place and matted onto Crisp Cantaloupe cardstock. 


The theme of this week's Simon Says Stamp Monday Challenge is Five. I'm entering my card with five flowers. I'm also entering this card as my second contribution to Simon Says Stamp Wednesday Challenge where the theme is "Anything goes" (my first contribution is here).

Card: Leonardo Stationery 350 gsm Smooth White Card, Stampin' Up Crisp Cantaloupe, Hobbycraft 160 gsm white card
Paper: Stampin' Up Sycamore Street DSP
Inks: Stampin' Up Crisp Cantaloupe, Daffodil Delight and Pistachio Pudding
Stamps: Stampin' Up Hardwood, Petite Petals and See Ya Later 
Other: Green Ribbon from my stash, Stampin' Up Petite Petals Punch, Papercraft adhesive gems in Capsule Verde

Thursday 1 May 2014

Roaring savanna sunset


I love the Lawn Fawn stamp sets, one day I will have them all. I increased my collection from 1 set (Critters Ever After) to two after I received the aaahh so cute Critters on the Savanna set. There is so much you can do with these cute little guys, but this time I was inspired by three challenges. First of all, I saw the savanna sunset in this week's Freshly Made Sketches sketch (below). Also, I saw the savanna sunset colours in this weeks Simon Says Stamp Monday challenge which is themed Not So Mellow Yellow. Indeed, not very mellow, with that big roaring cat sitting there in the middle of it all! And third, this week's Simon Says Stamp Wednesday challenge is Anything goes but with the amazing and inspiring DT using Lawn Fawn stamps, I felt like I should join in the fun.


I started with creating the sunset using Tim Holtz distress inks, ink blending tools and masks. I then stamped the critters in black ink and fussycut using scissors. They were sponged with Black Soot ink enough so that they would look like shadows against the sunset, but still showing those cute details through the ink. For the sentiment, I used a scrap piece from my stash that I have created earlier using Tim Holtz distress paints onto watercolour paper. I attached the sentiment onto my block in a wavy pattern. Lastly, I stamped some grass in black onto the savanna, and adhered everything into place and onto yellow carstock. I have to admit, I'm a teeny weeny bit proud of the colours of the sunset, I absolutely love playing with the distress inks. The way they layer, blend and make such a lively and vivid result is just amazing. And it's fun to get your hands literally dirty too!

Card: Leonardo Stationery 350 gsm Smooth White Card, Hobbycraft 160 gsm white cardstock, Daler&Rowney 190 gsm watercolour paper, Stampin' Up Daffodil Delight cardstock
Inks: Hobbycraft black pigment ink, Tim Holtz distress inks in Aged Mahogany, Black Soot, Fired Brick, Spiced Marmelade, Squeezed Lemonade and Wild Honey
Stamps: Lawn Fawn Critters of the Savanna